Home automation is now more affordable and more widely available than ever before, enabling people to make their homes into smart, practical, and efficient spaces. Look only as far as the Raspberry Pi 4 and Home Assistant combination if you’re keen to begin your path into home automation. With the help of these adaptable tools, we’ll walk you through the process of setting up your own home automation system in this guide.
Why Pick Home Assistant and the Raspberry Pi 4?
A robust, reasonably priced, and energy-efficient single-board computer, the Raspberry Pi 4 is ideal for do-it-yourself applications. You may build a unique smart home system that meets your demands when combined with Home Assistant, a well-liked open-source home automation platform.
Here are a few strong arguments in favor of choosing this combination:
- Affordability: The Raspberry Pi 4 is affordable and offers outstanding performance for jobs involving home automation.
- Flexibility: Home Assistant is flexible to different smart home setups because it supports a wide array of devices and integrations.
- Support from the community: Both the Raspberry Pi and Home Assistant have active communities that offer thorough documentation and assistance to users of all skill levels.
- Privacy: You have more control over your data and privacy by hosting your automation system locally on the Raspberry Pi.
What You Will Need
Gather the necessary items before we start the setup procedure:
- Raspberry Pi 4: There are several variants to pick from, but a 2GB or 4GB RAM version is typically enough.
- MicroSD Card: A minimum of 16GB is advised in order to fit the operating system and software
- Ensure that you have an adequate power source for the Raspberry Pi 4.
- For connecting your Raspberry Pi to a monitor or TV, use a micro HDMI to HDMI cable.
- Mouse and keyboard: for initial configuration.
- Ethernet or Wi-Fi can be used for an internet connection.
- Home Assistant Compatible Devices: Smart bulbs, plugs, thermostats, or other smart devices you want to control.
- Optional Accessories: A case, heat sinks, and a fan for better cooling.
Install Home Assistant Operating System
- Download and install the Raspberry Pi Imager.
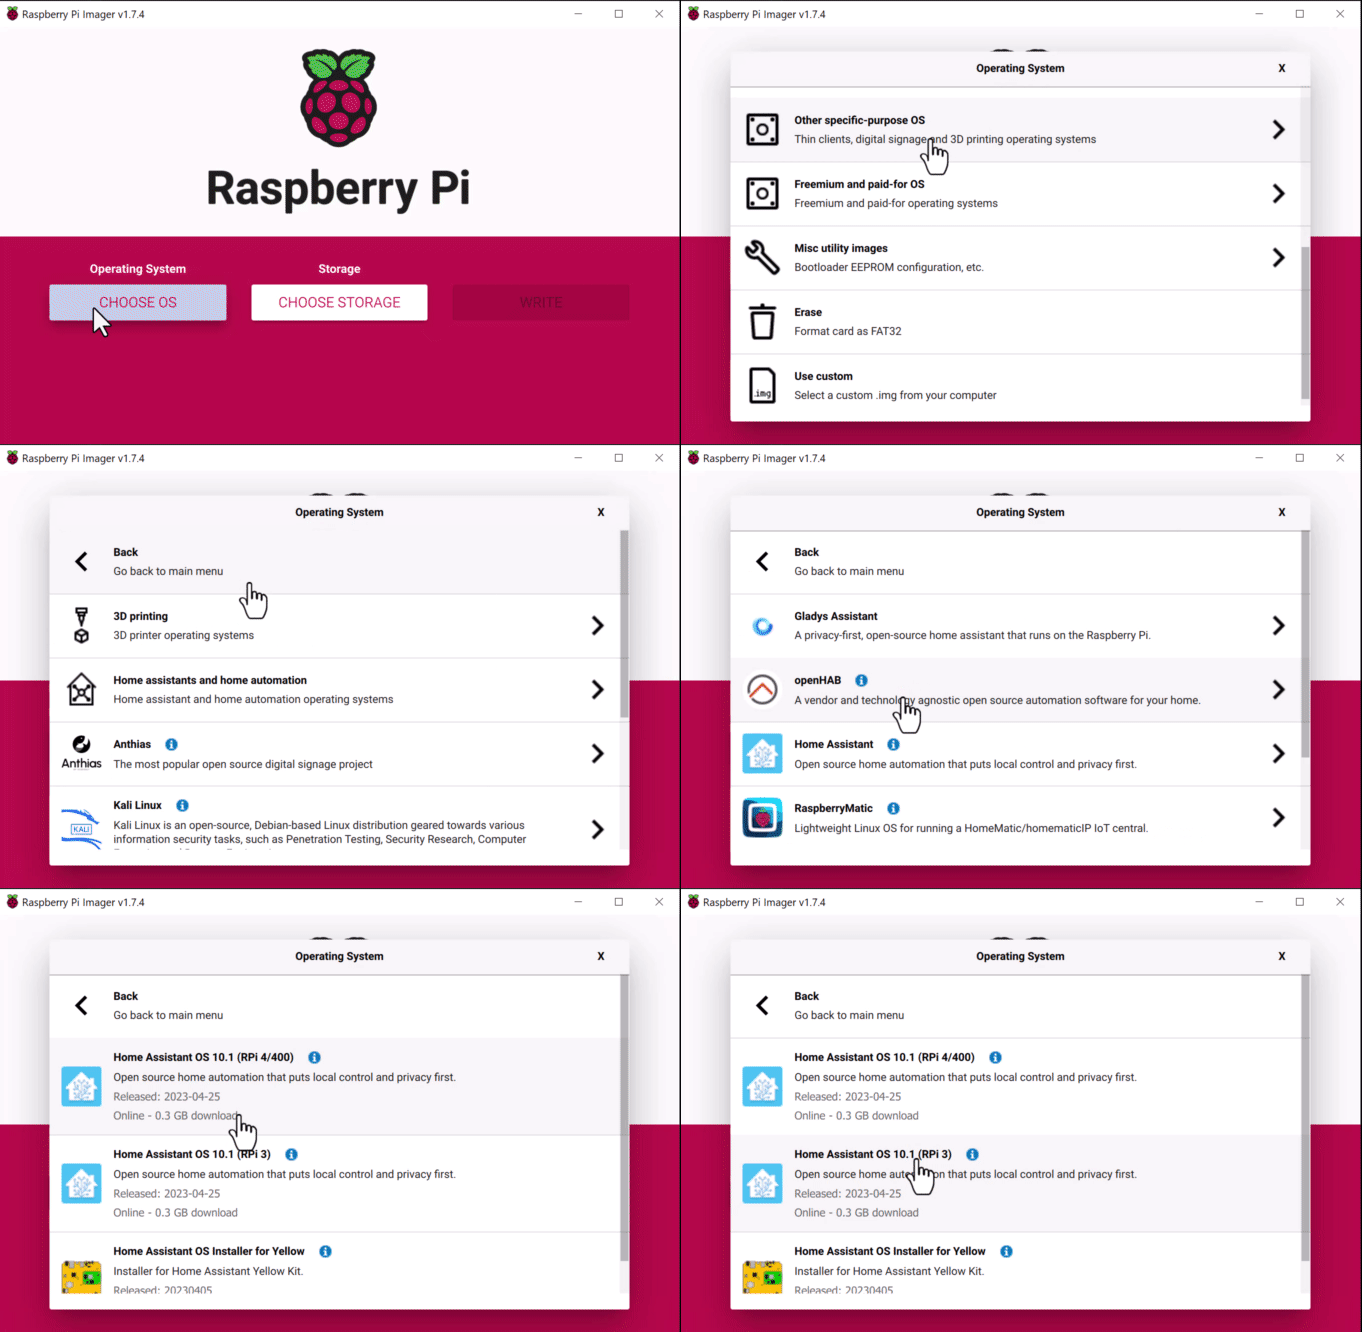
- Choose the operating system:

- Choose the storage:
- Insert the SD card into the computer. Note: the contents of the card will be overwritten.
- Select your SD card.
- Write the installer onto the SD card: Wait for the Home Assistant OS to be written to the SD card.
START UP YOUR RASPBERRY PI
- Insert the SD card into your Raspberry Pi.
- Plug in an Ethernet cable that is connected to the network.
- Connect the power supply to start up the device.
- In the browser of your desktop system, within a few minutes, you will be able to reach your new Home Assistant at the IP address of your Raspberry Pi followed by “:8123” (e.g., http://192.168.1.100:8123). Follow the setup wizard to create your Home Assistant account.
Configuring Home Assistant
With Home Assistant installed, it’s time to configure your smart home:
- Integrations: From the Home Assistant dashboard, go to “Configuration” > “Integrations” and add your smart devices.
- Automation: Create custom automation and scripts to control your devices based on triggers and conditions.
- Add-Ons: Explore the Home Assistant add-on store to extend functionality and integrate with third-party services.
- User Interface: Customize your dashboard using Lovelace, Home Assistant’s editor.
- Security: Secure your Home Assistant installation by enabling two-factor authentication and setting up secure remote access.
In our next post, we’ll dive deeper into the world of Home Assistant, exploring topics like configuring integrations, setting up automations, and creating a user-friendly interface with Lovelace. Stay tuned for a more in-depth guide on making the most of your smart home. Happy automating!


